|
<< Click to Display Table of Contents >> Using events |
  
|
|
<< Click to Display Table of Contents >> Using events |
|
With the events you show appointments in your calendar. These can be holidays or vacation dates, but also your own, personal appointments. You can manage your own recurring appointments, such as birthdays, in lists and reuse them every year when creating the calendar.
 Toolbox view Events Add event: Enter your own events. Add event list: Choose from existing event lists, create your own event lists, load existing event lists and display them in the calendar. An event can only be displayed on the page if the layout provides for a corresponding display of events. Events can appear on a page in the form of a text variable element or as a cell of a calendar. |
 Add event To create your own event, click the Add event button in the Events section. The adjacent input mask will open. A new list will be created automatically. Custom list: Click on the word Own list to rename your list, e.g. Birthdays. Caption: name of the event as it appears in the list Text: Insert here the event text to be displayed in the calendar. If the text field is empty, the Caption will be displayed in the calendar. Type: Choose from the event types Fixed date, Birthday, Time frame, Weekday, Calculated. Date: Type the date or select the date from the Calendar icon. Period: For one-time appointments, select None. For recurring appointments, select Daily, Weekly, Monthly, Yearly or Every 4 years. Clicking on the Checkmark at the bottom right of the input mask accepts the displayed settings for the event. Clicking on the Cross symbol ("Cancel") closes the window and ignores any changes made. You have all dates in view with a one-page calendar with yearly overview. Read more in the blog post (with video) "Create and print your own birthday calendar" ("Geburtstagskalender erstellen und selbst drucken"). |
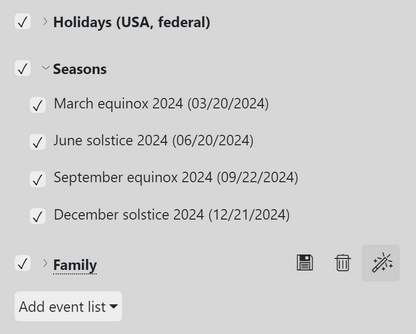
 Select event list |
The program already brings vacation lists and vacation dates. To display them on the calendar pages, first switch to the Events menu section. Click Add event list. Select an event list, e.g. Holidays for Germany. You can add as many event lists as you want. You can expand and collapse the lists using the small triangle next to the list name.
|
In the case of an Event list, the existing events can be edited.
Click on the event name to edit the name or the entry itself.
The following icons are available next to each event or event list:
|
Show/don't show event or event list |
|
Save list |
|
Delete event from list or delete event list |
|
Edit style of event or event list |
For example, to not display a holiday from the holiday list that is not celebrated in your state, uncheck the Checkmark in front of the event.
If you want to permanently remove a holiday for your own list, click the Trash can icon to delete the event from the list. Then save the list under a new name of your own, e.g. Holidays (State) on your computer. Via Add event list, you can now add your saved list to your calendar.
How an event is displayed is determined by the event style. Calendar templates always come with their own style, designed to match the design of the template. This style can be overridden individually for single events or event lists.
 Edit event style of the "Holidays" list To edit the style of an event or event list, click the |
 Editing the properties of "Cells displaying events" 1. Click the Add property button and select from the list the property you want to change - in this case cells that display events. 2. Now click Add value and select the value to be adjusted, e.g. Event - Font color or Event - Font Size. |
 The values to be adjusted are selected 3. Adjust the value. In the example image opposite, the font size for events has been adjusted, as well as the position of the event text in the cell. You can see the effect in the image background on the calendar page. The appearance of events that are not displayed in calendars but within text variable fields (%events%) is done directly on the text object. |
 Event variable is inserted on the page Most calendar templates already include event placeholders. If you have chosen a free design, you can use the way described here to display events on your calendar page. Switch to the Calendars menu section. Drag the Events object from the Toolbox to your calendar page. |
 The calendar is assigned to the event field as a reference. To set a Reference to the page's calendar, double-click the object or select Properties after right-clicking. Select the appropriate calendar object of your page under Reference. |
Learn how to "Add an image to your own appointments" (eigene Termine mit einem Bild versehen) in the blog.