|
<< Click to Display Table of Contents >> Chroma Key |
  
|
|
<< Click to Display Table of Contents >> Chroma Key |
  
|
 Chroma Key You can find the Chroma Key effect in the Toolbox of the AquaSoft Stages under the Objects tab in the Live effects section. |
After inserting an object into the Chroma Key effect, you can select one or more colors to be displayed transparently in that object. For example, you can record a video against a green background. This background can be removed or replaced by another background in the Chroma Key effect.
Unfortunately, the effect cannot perform miracles, but depends heavily on the image material used. The more uniform the background is and the more clearly it stands out from the foreground, the better it can be removed by the effect.
|
You can get a practical tutorial (with video) for the Chroma Key effect in our blog post "Farbbasierte Bildfreistellung mit Chroma-Key-Effekt in Stages 10". |
 Chroma key effect in a chapter in the Timeline Drag a Chapter object from the Toolbox to the Timeline. In the first track, insert the background that you want to be visible instead of the color selected in the Chroma key effect. In the second track of the chapter, drag the Chroma key effect. Now insert a video or an image into the Chroma key effect. |
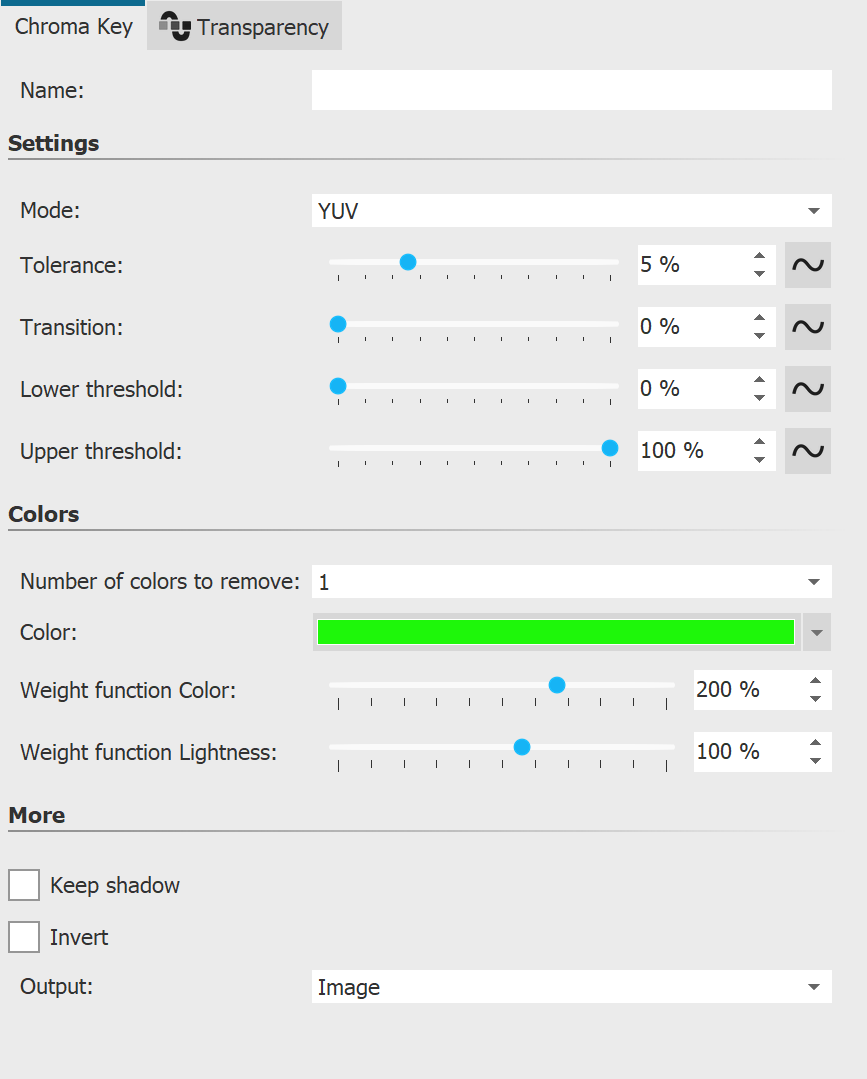
 Settings for the Chroma key effect The effect can work with different modes. Depending on the selected mode, different setting options are available. In the Properties area you can set the following options for the Chroma Key effect: •Name - For a better overview in the Timeline you can give the effect container its own name. •Mode - YUV, HSV, HCV, RGB, Legacy - Choose which color model to work with. Which mode fits best depends on your source material. Depending on the color model, the neighborhoods of colors differ, so they separate differently. •Tolerance - Specifies how far the color may deviate from the selected color key. •Transition - Specifies how hard or soft the transition from the color key to the non-color key may be. •Threshold - Allows more precise clipping at the transitions. You can make areas completely transparent that are only partially visible (lower threshold) or completely opaque that would otherwise already have a slight transparency (upper threshold). •Number of colors to remove - Up to four colors can be set. It should be noted that the tolerence is often too strong with more and more color tones. The transparency of the individual key colors can be used to reduce the tolerance for the individual color tones. •Color (Color-Key) - Use the eyedropper to select the color to be displayed transparently. •Weighting - Set to what extent the weighting should be on color or lightness. •Keep shadows - Shadows that lie on the color key will be displayed dark. •Invert - Everything will be displayed transparent except the area with the selected color. •Output - Choose which result you want to be displayed in the Layout designer: the generated image, the original, the chroma key mask or the color difference. This allows you to evaluate and tune your effect in a more sophisticated way. For example, switch to the "Mask" output mode to find the best setting for the thresholds, since "dark spots" are immediately visible here. Most of the time you will change the output mode back to Image afterwards. The Color difference option shows what the Chroma key effect sees internally, namely the difference between the key color and the image. The smaller the difference (darker), the more likely the spot will become transparent. Using the sliders that adjust the weighting of each color component, you can adjust the effect so that the areas to be cut away appear as dark as possible and the colors to be kept appear as light as possible. Here, too, you then switch the output back to image. |
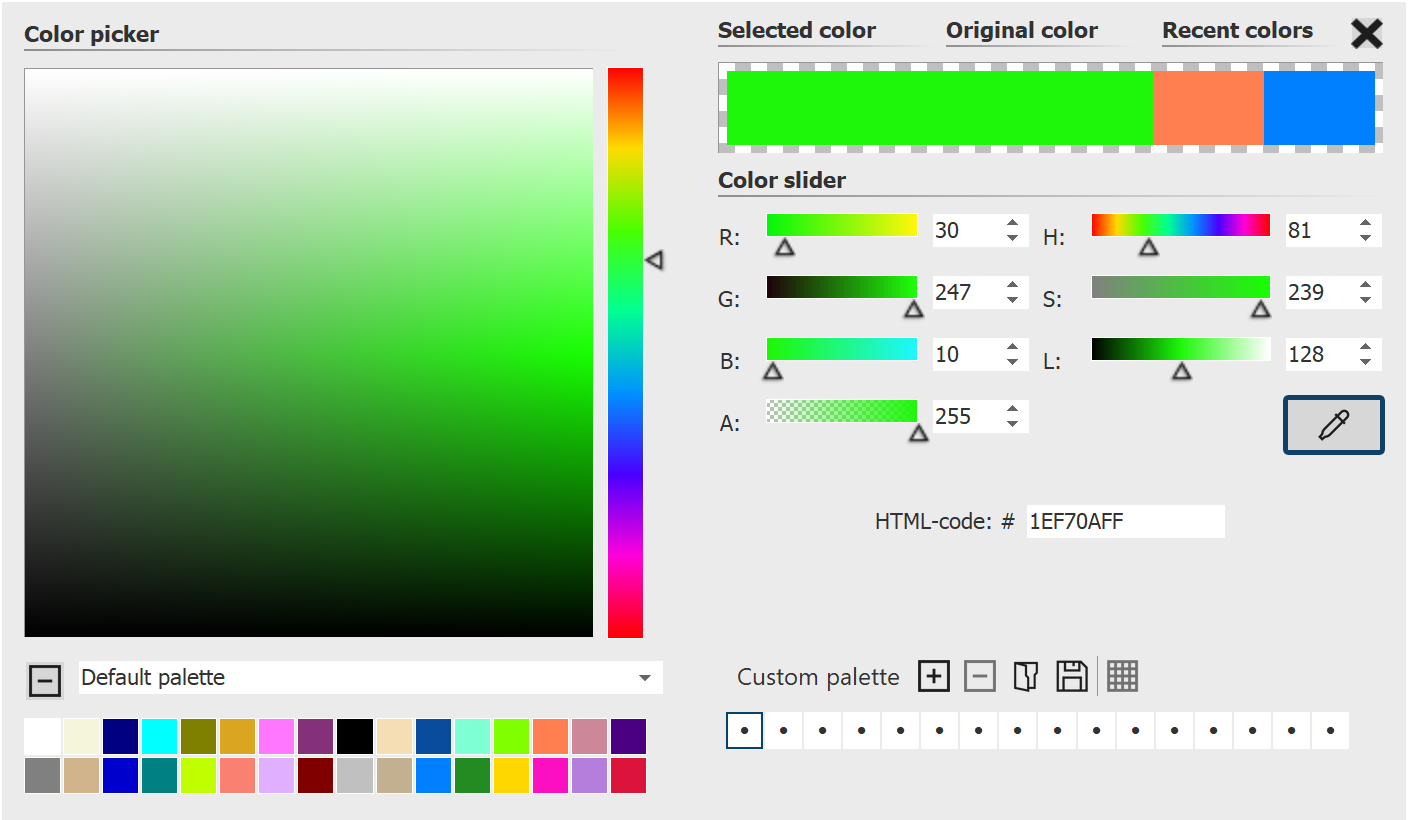
 Select color for color key To select a color for the Color key, click on the already preset green. Now the color selector appears. In the Color picker dialog, click on the eyedropper icon to select the color from your video or image that is to be displayed transparently. To do this, hold the eyedropper over the thumbnails in Timeline. The two sliders Weight function Color and Weight function Lightness are now used to set the transition or the permitted deviation of the color tone. This requires a bit of intuition and a clever combination of the two settings, which should be adjusted appropriately depending on the initial setting. |
||
|