|
<< Click to Display Table of Contents >> Insert images |
  
|
|
<< Click to Display Table of Contents >> Insert images |
|
In AquaSoft Vision and Stages you can insert your images in various ways. Some of them are very intuitive to use, while others are more extensive tasks. Learn which methods you can use to insert images in this section.
Valid for all variants:
•You can select or mark an image for insertion by clicking it with the mouse.
•Multiple images can be selected by holding down the CTRL key plus clicking the mouse.
•By holding down the SHIFT key and clicking with the mouse, you can select the first and last image, including all the images in between.
•You can select all images with CTRL + A .
|
In the Toolbar in the upper area of the user interface there is a large Plus symbol. Click on the icon to open a view of your folders and storage locations. Here you now select the location of the images you want to insert. Select one or more images and confirm with Open. |
 Image object Select the Objects tab in the Toolbox. In the Default section you will find the Image object. Either insert it with a double click or drag it with the mouse to the Timeline or Image list to the place where you want to insert an image. It is also possible to drag the image object onto the Layout designer. After the Image object is placed, the view of your folders and storage locations opens. To select one or more images, proceed in the same way as described in the section above. |
 File browser in the Toolbox In the Toolbox you will find the File browser under the Files tab. In the top line, select the directory or folder where your files are located. The images are displayed as small preview images (thumbnails) in the File browser, with the file name below them. With the help of the search field, which is located at the bottom left, you can search specifically for a file name or file format and thus display the desired file more quickly. To select one or more images, proceed in the same way as described in the above section. Drag one or more thumbnails to a location in the Timeline to place the file or files. Pay attention to the small red line. This shows you where you will place the file when you release the mouse button. Images, videos and sounds that are already used in the current project are marked with a check mark in the file browser. |
"Drag-and-drop" is the principle of "dragging and dropping". If you have opened a folder outside the application that contains your images, you can drag the images directly into the program window. To do this, shrink the program window by pressing the Windows key and the down arrow on your keyboard at the same time (or click the icon in the upper right corner to shrink the window). Now you can conveniently drag files from a folder or from your desktop into the program.
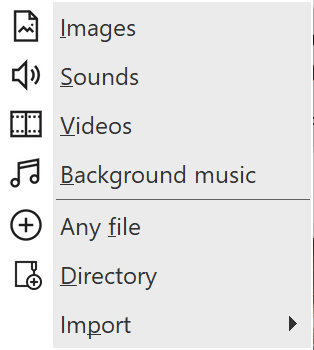 If you choose the option Images, the file selection dialog opens and you can select one or more images - as described above. The Directory option allows you to insert a complete folder. If you select this option, a dialog appears in which you can define exactly which data is to be inserted and whether subfolders are also to be inserted. |
In the Wizards menu you will find the Import Wizard. With this you can insert images directly from the camera or scanner into the project. You will find a detailed description in the Import Wizard chapter.
If you have a PowerPoint presentation and want to transfer the individual slides to your project, follow the instructions in the PowerPoint Wizard chapter.
If you want to remove an inserted image, select the object and press the Del key . Or right-click the object and choose Remove.
|
More about inserting images (and videos) you can see in our video "Bilder und Videos hinzufügen (Erste Schritte in DiaShow 10)". |