|
<< Click to Display Table of Contents >> Layout and sublayout |
  
|
|
<< Click to Display Table of Contents >> Layout and sublayout |
|
 Layout  Sublayout You can find both effects in theToolbox under the Objects tab in the Object effects section. With the help of the Layout and Sublayout effect, you combine several individual images into an overall image with a regular or random arrangement. The Sublayout effect is used to insert additional image collages at one or more positions within the layout effect. In addition, it is possible to let images exchange their places with each other. Photos, videos and texts can be used in the effect. For the design with color fields, the Dynamic Shape Rectangle is recommended. In a separate toolbox section Layouts you will already find a large selection of templates for arrangements. |
1 Insert Layout effectDrag the Layout effect from the Toolbox to the Timeline. 2 Bilder einfügen To insert images into the effect, drag an Image object from the Toolbox into the Content area located within the gallery. In the following image selection, you can now select several images at once by holding down Ctrl and clicking on the desired images. Select Open to insert the images. Alternatively, you can also use the image selection in the File browser tab. Drag the images from the File browser into the effect object. 3 Customize images As long as the images are arranged one after the other in the Timeline, they appear one after the other in time. The special attraction of the effect, however, is that the images are displayed at the same time and in this way are combined with each other to form an overall view. To have the images appear in the layout at the same time, arrange them one below the other. If you want the images to appear with a time delay, arrange the images one below the other in a staggered fashion. If the images are to appear in the layout at the same time, it is more convenient for the viewer to either select the same overlay for all images or to dispense with an overlay altogether. To align all images, select all images that are in the effect. Hold down the Ctrl key while clicking on each image. Now go to the Properties window and under Fade select either None or a specific fade that all images should receive. Under Duration, enter a value of 20s, for example, so that the viewer has more time to let the image collage take effect on him. |
|
Learn more about the layout effect and see examples of its use in the video "Create your own layout (with animations) ". |
 Eigenschaften des Layout-Effektes Layout effect settingsIf the frame of the Layout effect is selected, you can define the details for your collage in the Properties window. At the Layout point, choose according to which default your layout should be created: Grid (vertical) / Grid (horizontal) - Evenly arrange all images by columns or rows. The structure of the collage for the layout option Split randomly is different for each new display. If you want to keep the displayed constellation, you have to set a code further down with the switch Random value. This code is a kind of "DNA" of the layout, which can be passed on and will output the collage with always the same properties. Click on the cube icon to create a new, different arrangement. The All Fullscreen layout preset is a special case. The images can be displayed as full screen with border using this option. With this setting, arrange the images one after the other. There is no image swap animation. There is a slider for determining the space between and the margin. With Spacing you determine how big the spaces between the images should be or if there are any at all. For a layout without spaces, the slider should be set to the value 0. With Margin you determine whether there should be a margin around your image composition or how wide it is. For a layout without a margin, select the value 0. With the Force Crop option, you enable the layout to display the images without gaps. This automatically crops each image to fit exactly in the layout. The order of your images in the layout is determined by the track position of each image in the effect. Invert order "reads" the tracks from bottom to top. Background color for layout effectTo get colored borders or spaces in a layout, you can use a colored background. To do this, insert the Layout effect into a Chapter object. Then place the Colored background from the Toolbox in a track above the layout effect. Select the desired color in its properties. Animation in layout effectUse the Animation section of the effect settings to specify whether the images in the layout should change places using an animation or not. If None is selected, there will be no animation. Shrink layoutA layout can be resized and moved in the Layout Designer. To do this, select the layout effect in the Timeline and resize it using the dashed selection frame in the Layout Designer. |
 Layouts sorted by number of images Using predefined layoutsBelow the object effects in the toolbox you will find a selection of templates for arranging images. The templates are sorted by the number of images used. Within the section, you can expand and collapse the areas with the -/+ symbols for a better overview. To use one of the predefined layouts, drag a template from the Toolbox to the Timeline at the desired location in your project. Now replace the placeholder images in the layout effect and sub-layout effect with your photos. The easiest way to do this is to drag your images one at a time from the Toolbox's File Browser to the placeholder and release when the Apply Templates hint appears. |
A layout is defined by the number of inserted images and the layout effect settings. Instead of an image, however, one or more sublayouts can be inserted into the layout effect.
The sublayout in turn can then consist of several objects or even further sublayouts. The position at which a sublayout appears is determined by the track order in the timeline. The following example shows how to work with sublayouts.
 The layout effect comes under the colored background Step 1Drag the Colored background and the Layout effect from the Toolbox into a Chapter object. Choose a color for the Colored background in the Properties. Paste four photos one below the other in the Layout effect. Click the frame of the Layout effect and use the following settings: Layout: Horizontal (split) In this example, always work with Force Crop. |
The four images are now arranged side by side in the Layout designer, the first image on the left is larger than the three next to it.
 View after step 1 |
 View after step 2 |
 The sublayout is dragged into the layout effect. Step 2Now drag the Sublayout effect onto the second image (Strawberries). Release when a font appears Apply template. Drag the third and fourth images to the sublayout as well. |
 View of Timeline after step 2 Use the Layout: Vertical (even )setting for the sub-layout . In the Layout designer, you will now see the large image on the left and the three other photos in strips below each other. The middle image strip (blueberries) should now be divided once again. |
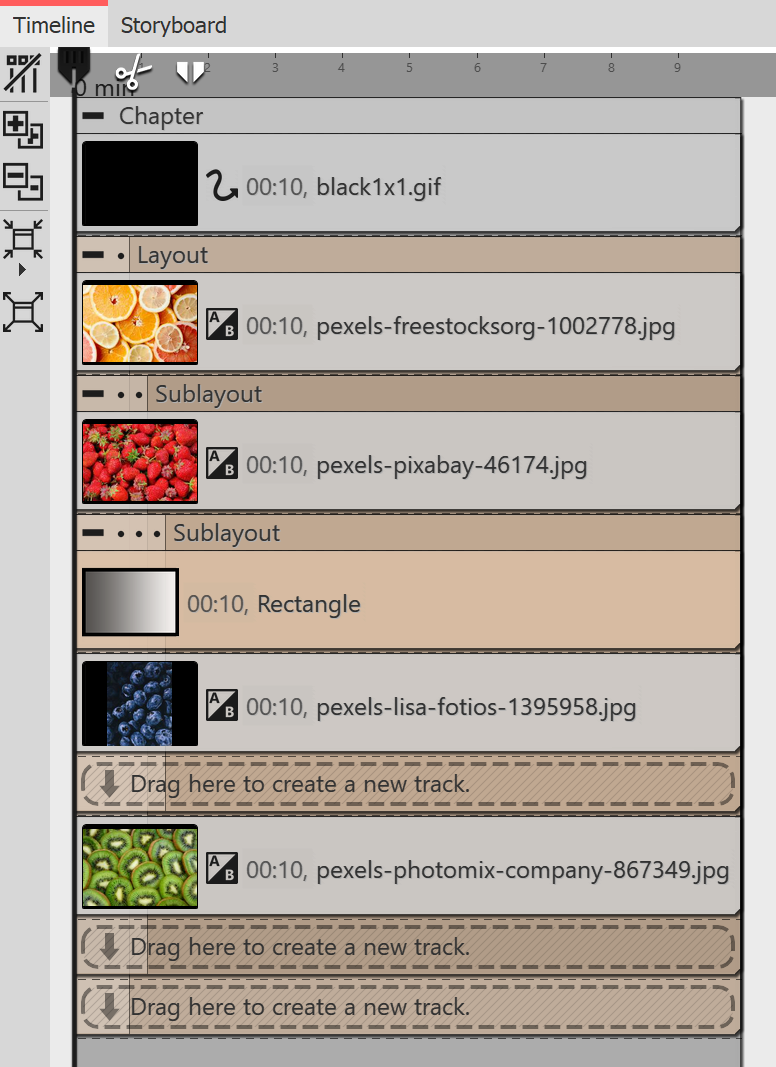 Use the Sublayout effect again and drag it to the center 3-image (Blueberries) in the Timeline. This sublayout is given the Layout: Vertical (Even) setting. In the Toolbox, pick out the Rectangle dynamic shape and drag it over the image in the last sublayout. Set a suitable color. You have now created a layout with two sublayouts. Add text by placing a text object in the track below the layout effect. Position the text on the colored rectangle in the Layout Designer. |

Layout with sublayout, colored rectangle and font