|
<< Click to Display Table of Contents >> Adding images |
  
|
|
<< Click to Display Table of Contents >> Adding images |
|
Under the menu item Images the Toolbox appears divided into two parts. In the upper part you will find the File browser, with which you can browse your computer. The lower part serves as Tray.

Insert image into template
In the Page overview, select the page on which the image is to be inserted by clicking on it. If you are working with a template or layout, drag the image onto the placeholder with the left mouse button pressed until it turns white and release the mouse button. The program will crop the image.
In the Page overview, select the page to be filled with one click. Drag an image from the File browser or Tray directly onto the open page to the desired position in the Page editor.
 Resizing an image in the Page editor At the corner handles of the dashed selection frame, drag the image in the Page editor to the desired size. Hold down the Shift key while dragging the handles to maintain the aspect ratio. At the rotation handle centered on top of the image, the image can be rotated. |
 In the Pro properties the image size is also displayed This feature is only available in the Pro version. In the Properties of the image you can also set the size and position of the image by manual input. Open the Properties window of an image in the Page editor by double-clicking on the image or by right-clicking on the image and selecting Properties. At the top of the Pro tab you will find additional design settings. For example, by adding the appropriate value, you can change the opacity of the image. |
 Edit crop Right-click on an image and select Edit crop to change the image crop. This is recommended for images that have a different aspect ratio than the image selection frame you set. This way you can also zoom images. |
 Move image section Use the mouse to move the image under the crop frame. The pale areas of the image will not be displayed on the calendar page. Confirm the new crop by clicking the Apply button. |
 Zoom into image subject To zoom in or out of an image subject, use the magnifiers at the bottom of the image. |
|
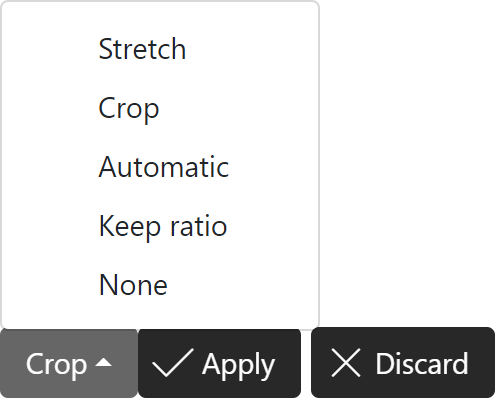
The following modes are available for the aspect ratio: Stretch: Stretches or compresses the image to fit the aspect ratio of the selection frame. Crop: Crops the image to fit the aspect ratio of the project. Automatic: Selects a mode between Crop and Keep Aspect Ratio. Keep ratio: Image is fit into the selection frame while maintaining the image aspect ratio. None: Image is displayed original. It starts at the top left edge of the selection frame. |

In the Toolbox, the images that have already been used are marked.
In the File browser and Tray, a Page icon with a check mark appears next to images that you have already used in your project. Left-click the Checkmark icon to see which page or pages the image was used on.
|
If an image was only used on one page, clicking the Checkmark icon opens the page in the Page editor where the image was used. |
|
If an image has been used multiple times or on multiple pages, the Checkmark icon with multiple pages appears. Left-click on the checkmark and a selection list of the pages on which the image has been used appears. By clicking on Go to... in the selection list, this page will be opened in the Page editor and the corresponding image will be selected. |

Drag replacement image onto the existing image
To replace an image with another and apply its properties, drag the new image from the Toolbox directly onto the image to be replaced until it appears whitish. All the properties of the previous image (size, image effects, etc.) are transferred to the new image.
 Replace existing image with new image in Properties Alternatively, double-click the image to be replaced and select the new image from your computer in the Properties window via the Folder icon. All properties of the previous image (size, image effects, etc.) will be applied to the new image. |
 Remove image from placeholder If you want to remove an image from a layout, double-click the image to open the Properties window. Next to the file name you will find a crossed-out Circle icon. If you press this, the inserted image will be removed and the original placeholder will be displayed again. If you want to remove an image completely with its layout and placeholder, select the image and press the DEL key or right-click Delete. |
You accidentally removed an image from the Page editor? Press the Undo arrow at the top of the Page editor or CTRL+Z . The last step will be undone.